My first ZMK Planck, Part 1 — The decision
A disclaimer before anything else.
Nothing in this series is brilliant. The solution I landed on probably exists in a dozen other builds I have not seen, and a real keyboard designer would find a tidier way to do it. I am not solving a problem anybody else has. I am solving a problem I invented for myself, with parts I already owned, because I wanted to.
That is the entire reason this is written down. If you are here for state of the art, this is not it. If you are here for how someone talked themselves into a build and what it cost, read on.
1. Waiting for something that was never coming
I have been a Planck user for years. Two of them sit on my desk right now. Both wired.
So for years I kept waiting for the next revision to be the one.
Rev6 came — a full hardware rework, STM32 Cortex-M4, encoders, the works. USB cable. Then rev7 arrived in 2023 with north- and south-facing backlight, a USB port moved lower so it breaks less, eight encoder slots, new plate and case options. Also a USB cable.
Every generation got better at being the keyboard it already was. None of them got a radio.
There is a specific kind of waiting where nothing is actually on the way and you know it. You are not waiting for a release date. You are waiting for someone else to want what you want badly enough to build it. That can go on indefinitely, and in my case it went on for years.
Meanwhile I had been using ZMK on Corne builds — shields, keymaps, the build container, the whole loop of flashing something and finding out which pin you got wrong. I knew the firmware. I had just never connected that to the Planck sitting in front of me.
2. The decision, and the shelf that made it cheap
The thought that ends the waiting is not inspiring. It is just arithmetic.
If I already know ZMK, then the firmware half of a wireless Planck is solved. What is left is hardware — and hardware I would have to make. That is the whole gap. Once you see it that way, waiting stops making sense, because nobody is going to close a gap that only exists for you.
What made it an actual decision instead of a daydream was the shelf.
A set of Choc v2 switches had been sitting in storage for a few years. So had a Boardsource Technik_0 acrylic case, a gift from a friend long ago. Neither had been bought for this. They were leftovers from intentions that never became builds, the kind of parts you move from one drawer to another and feel vaguely guilty about every time.
So the project cost nothing to start. Switches: owned. Case: owned. Plate: owned. Keycaps: owned. Firmware: already understood. The only things I would have to buy were a controller and a battery.
Choc v2, Technik_0, 4x12, wireless, mine. That is where it became real.
3. Everything I had to decide before touching a soldering iron
This is the part I actually want to write about, because none of it involved building anything. It was a few evenings of arguing with myself, and every answer constrained the next one.
First: measure, then decide
Before any of the questions below, one number. I dropped a switch into the plate, seated the plate in the case, and measured floor to plate underside.
About 5 mm.
That is the budget for everything — controller, battery, switch, wiring. Inside 5 mm, or outside the case. There is no third option.
Then the Choc v2 made it worse. The housing has a large centre boss that protrudes below the plate at full key travel (switch dimensions on Deskthority). So it is not even a flat 5 mm: under the switch field, usable space is whatever is left after 48 switches finish moving.
Every decision below is downstream of that number.
PCB or handwire?
Here is where a build log usually tells you the author could not design a PCB.
I can design a PCB. I did it at university; the skill is in there somewhere under a few years of dust. That is not the obstacle. The obstacle is everything that happens after you design one.
I have been through that cycle more than once. You design a board. You send it offshore, because the quantity a manufacturer wants is never the one board you actually need. You wait. It arrives. You find the mistake. You do it again. And then the POCs sit on a shelf — version after version of a thing that was almost right — until years later you throw the whole stack out.
I did not want another shelf like that. Not for a keyboard I wanted to be using.
And underneath the reasoning, a simpler reason: handwiring is fun. Not in the tidy way build photos make it look — nobody enjoys the fiftieth identical joint. The fun is what comes after. Something does not work. There is no schematic to blame and no vendor to email, because every single connection in the thing is one you made. So you sit down with a multimeter and probe joints until the fault admits where it lives.
And the faults arrive out of nowhere, straight into your face, in ways you did not plan for. That is the appeal. A PCB hands you a board that either works or does not. A handwire hands you a puzzle that is entirely your own fault, which turns out to be the more interesting of the two.
(Writing that in the planning phase, before any of it happened, was easy. Part 5 is me finding out how much I meant it.)
Handwiring also hands back space. The stock 1.6 mm PCB and its hotswap sockets ate most of the interior height. Remove them and that height is mine to spend — which, at 5 mm, matters more than anything else on this list.
Decision: handwire.
Which controller?
Requirements, short and unforgiving: Zephyr support, 16 GPIO, BLE.
Sixteen, because 4 rows + 12 columns is exactly sixteen. Not “sixteen plus a couple spare.” Sixteen.
I looked past the obvious Pro Micro and XIAO footprints — ItsyBitsy, Feather, bare nRF52840 modules. Bare modules give the thinnest stack and are the wrong answer for a handwire, because hand-soldering castellated pads plus your own USB, LDO and charger is not a fun evening. What I wanted was a nice!nano-class board: UF2 bootloader, onboard battery charger, and a voltage divider ZMK already reads.
Decision: nice!nano form factor, nRF52840. (Part 4 is about what happens when the board you buy is only claiming to be that.)
OLED and encoder — the two things everybody wants
Let us be honest about these two, because every builder wants them and the reasons are not really functional.
An OLED on a keyboard tells you the layer you are on and the battery percentage. You could get both from the layer you are already holding and from your OS. Nobody has ever been saved by a keyboard display. A rotary encoder is genuinely nice for volume, and then it mostly sits there. What they actually are is the parts that make a build look like a build. They are what you photograph. I wanted both for exactly that reason and I would rather say so than pretend otherwise.
Here is the problem. An OLED is I2C — two pins. An encoder wants two more, usually three with its push switch. The matrix has already taken all sixteen. There is no seventeenth pin on this controller, and at 5 mm there is no room for either module anyway.
The OLED has a second cost that matters more on a wireless board: it is always drawing. A screen that stays lit and a panel that has to be refreshed turn a battery measured in weeks into one measured in days. On a keyboard with a 150 mAh cell, the thing that exists to display the battery percentage is the thing emptying it.
So both get cut, and the honest reason they hurt is vanity, not function. Rev6 and rev7 both make a feature of encoder support — that is what I was giving up to go wireless.
Decision: neither on the keyboard. Hold the OLED thought; it comes back.
Battery?
At 5 mm, capacity stops being the spec you shop on. Thickness is. A 3 mm cell gets roughly 110–150 mAh; 4 mm gets 150–200 mAh. And a JST connector is about 4 mm tall by itself, so it is solder-to-the-pads or hand the entire budget to a plug.
Decision: deferred — because by this point the shape of the real problem had changed. See below.
Power switch?
Strictly speaking, unnecessary. ZMK deep sleep idles in the microamps, which is months of standby, so a switch only earns its keep for long storage. And the case has no cutout for one, which at planning time settled it: nowhere to put it, no millimetres to spare.
Except it is on the finished board. Once the electronics moved off the keyboard, the switch stopped competing for space inside the case and became a part I could simply place where I wanted it. Cutting a slot in acrylic I was given is a decision you only make once; putting a switch on something I built myself is not.
Decision at planning time: skip it. What actually shipped: it is there — one of several things that stopped being a constraint the moment the layout changed.
The dongle
I already had an external nRF52840 dongle with an OLED on it, from earlier tinkering. In ZMK it can act as the split central: the keyboard becomes a peripheral, the dongle holds the keymap and talks to the host.
That is useful on its own — instant reconnect, works on a machine where you cannot pair anything, no BLE negotiation at the BIOS screen. But the thing I actually liked is that the dongle already has the display I could not fit in the keyboard.
Which quietly reframes the whole design. The screen does not have to be on the keyboard. The brain does not have to be on the keyboard either.
Decision: support both modes — standalone direct-BLE, and split-peripheral paired to the dongle.
4. The idea that made all of it fit
Add up the decisions and they contradict each other. I need a controller and a battery. Nothing with volume fits under the switch field. I want two different firmware personalities out of one keyboard. And there is no pin, no millimetre, and no room left anywhere.
The way out is to stop treating the keyboard as the thing that contains the electronics.
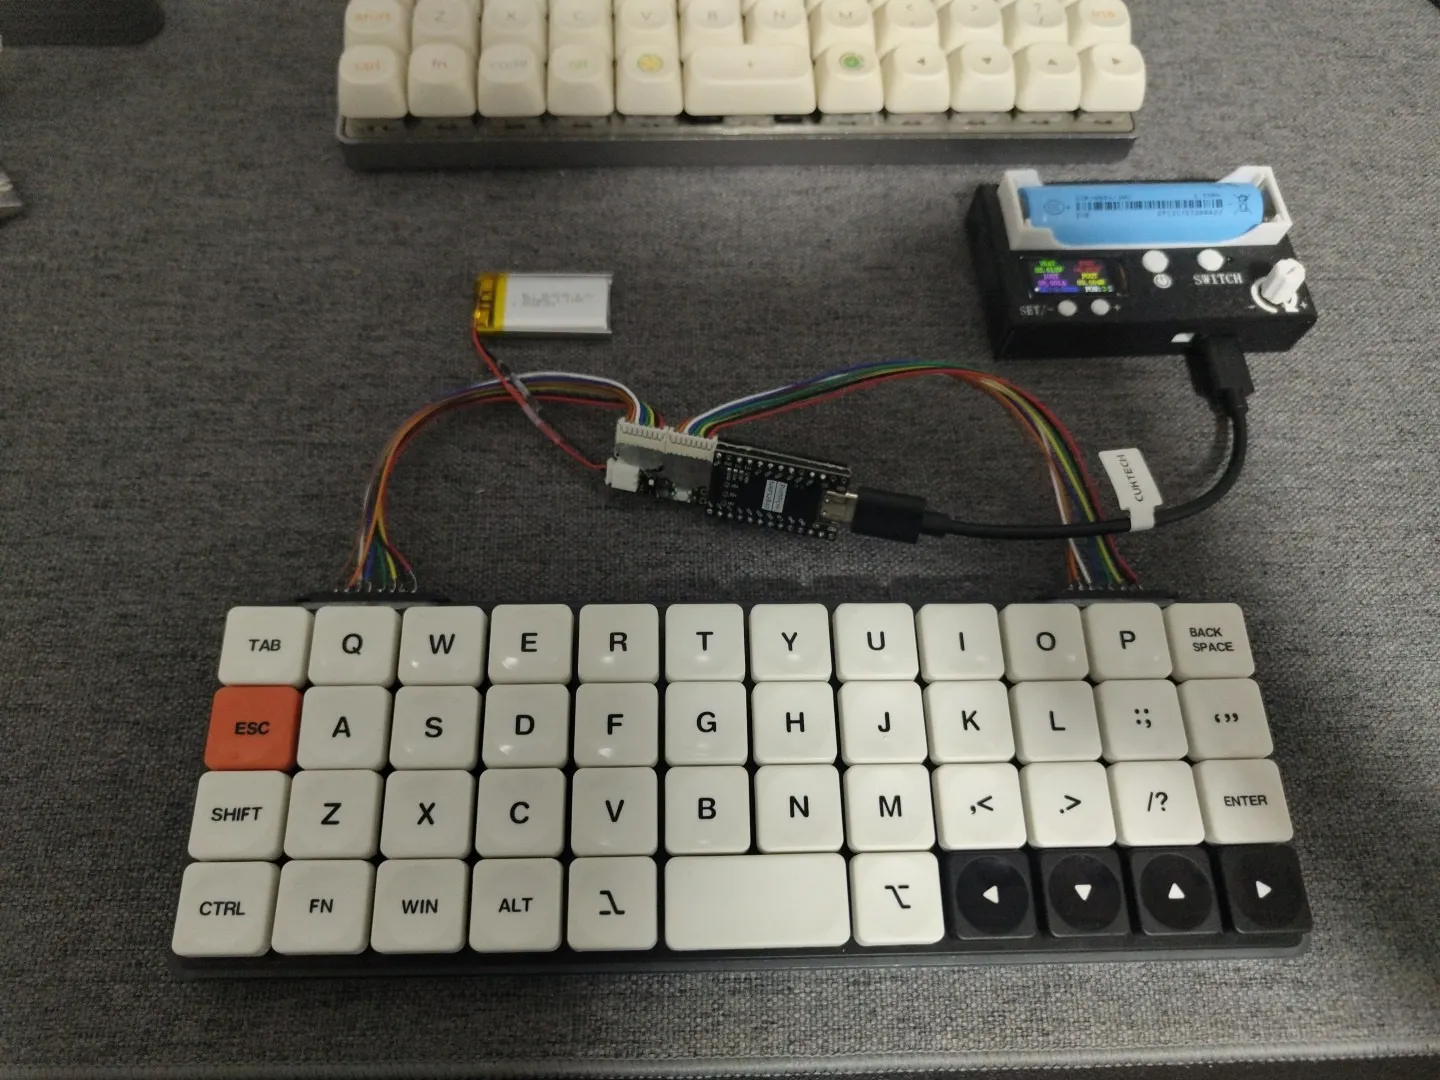
The keyboard is only a matrix. 4 rows, 12 columns, 48 keys, diodes, wire. No controller. No battery. No power anywhere inside the case. It is a completely passive object — it does not work on its own, and that is deliberate.
Everything else lives on a detachable bar that mounts along the rear edge of the case. The controller sits there. The battery sits there. The bar is outside the 5 mm envelope entirely, so the height problem evaporates — it was only ever a problem because I kept assuming the parts had to go inside.
And because the brain is now a module rather than a fixture, it is swappable. One keyboard, one passive matrix, and a controller bar I can pull off and replace with a different one carrying different firmware. Standalone today, dongle-paired tomorrow, without touching a single solder joint in the matrix.
Is this clever? Not especially. Detachable controllers are not a new idea, and someone reading this has certainly done a neater version. But it is the point where my pile of constraints stopped fighting each other, and that is the moment a project becomes buildable.
Of course, “the bar connects to the matrix” is doing an enormous amount of work in that sentence. Sixteen signals have to cross from a passive case into a removable bar, reliably, every time you reattach it.
That connector is Part 2, and it is the most interesting problem in the build.
Next: the controller bar — getting 16 matrix lines out of a passive case, and the connector decision I argued myself into.